Saturday, December 28, 2019

JSS Sitecore Headless Implementation

1: install Node.js
2: Install JSS CLI
npm install -g @sitecore-jss-cli
jss -version
(Note: JSS CLI is running in global mode because it was not installed in the local node_modules folder.)
3: jss create jss-app-demo react
4: cd jss-app-demo
5: jss start
6: run windows powershell
7: go to the project folder
8: jss scaffold MyFirstComponent
9: go to visual studio code and check in sitecore->definition->components->MyFirstComponent.sitecore.js
create a new fields here(copy existing field and make some changes)
fields: [
      { name: 'heading'type: CommonFieldTypes.SingleLineText },
      { name: 'headingdescription'type: CommonFieldTypes.RichText }
    ],
10:
go to data->routes->en.yml
11:addcomponent and fields in placeholders.
placeholders:
  jss-main:
  - componentNameMyFirstComponent
    fields:
      headingHello Sitecore JSS !!!!!
      headingdescriptionThis Sitecore JSS has been developed by rameshwar bhai !!!!!
12:
go to src->components->MyFirstComponent->index.js
import React from 'react';
import { Text } from '@sitecore-jss/sitecore-jss-react';

const MyFirstComponent = (props=> (
  <div>
    <p>MyFirstComponent Component</p>
    <Text field={props.fields.heading} /><br />
    <Text field={props.fields.headingdescription} />
  </div>
);

export default MyFirstComponent;

13:
install sitecore JavaScript Services 11.0.1 from
https://dev.sitecore.net/downloads

14:
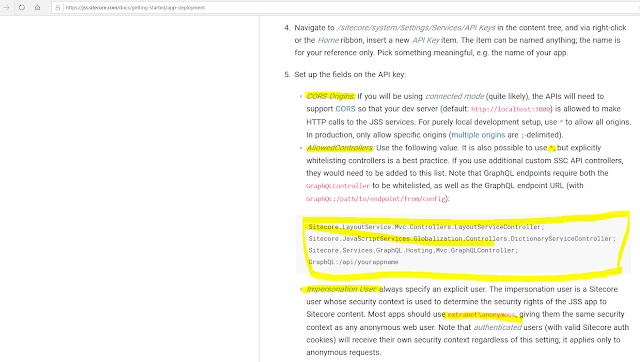
create the api key in sitcore to utilize the services
go to Sitecore->Systems->Settings->Services->API Key->Insert->API Key
give some name to api key.
go to quick info and copy Item Id
{0A981136-A0C2-469C-9F46-8522ED20D6C7}


15: Go go jss.sitecore.com and get the additional info


To test whether the Layout Service is working, make a test request to Layout Service on your Sitecore host: http://myapp.siteco.re/sitecore/api/layout/render/jss?item=/&sc_apikey={YOUR_API_KEY_ID}

if Layout service is working then it will give json data else Layout service is not working.
then you need ti installSitecore JSS (Sitecore JavaScript Services 11.1.0)


C:\Users\DELL\jss-headless-example>jss setup
Is your Sitecore instance on this machine or accessible via network share? [y/n]: y
Path to the Sitecore folder (e.g. c:\inetpub\wwwroot\my.siteco.re): c:\inetpub\wwwroot\sitecoresc.dev.local
Sitecore hostname (e.g. http://myapp.local.siteco.re; see /sitecore/config; ensure added to hosts): http://jss-headless-example.dev.local
Sitecore import service URL [http://jss-headless-example.dev.local/sitecore/api/jss/import]: http://jss-headless-example.dev.local/sitecore/api/jss/import
Sitecore API Key (ID of API key item): {0A981136-A0C2-469C-9F46-8522ED20D6C7}
Please enter your deployment secret (32+ random chars; or press enter to generate one):

Thursday, December 19, 2019

SETTING UP SOLR AS A SERVICE

SETTING UP SOLR AS A SERVICE

On the command line, type the following:
Fill out the path to the solr.cmd script, and the startup directory should be filled in automatically. Don’t forget to input the -f (foreground) parameter so that NSSM can kill it when it needs to be stopped or restarted.
Application tab on NSSM Service Editor screen capture to show path to Solr start script
The following step is optional, but I prefer having a clean and descriptive name in my Windows Service Manager. Under the details tab, fill out the Display name and Description.
Details tab for NSSM service installer for setting up Solr 5 as a service on Microsoft Windows
Click on Install service.
NSSM confirmation box saying "Solr5" installed successfully
Check that the service is running.
Microsoft Windows Component Services Running Solr 5
Go to your favorite web browser and make sure Solr is up and running.
Solr 5 running as a service on Microsoft Windows

Tuesday, November 5, 2019

Signing up for a Dynamics 365 Trial

Dynamics 365 Trials are useful if you want to learn about the capabilities of Dynamics 365 before buying the application or if you want to test development features.
To sign up for a Dynamics 365 Trial, go to https://trials.dynamics.com/: You will see the various Dynamics 365 apps available below.
Click on Sign Up Here
Click on "No, Continue signing up"
You will need to be verified through text message or phone call:
Depending on your situation, you may need to create a User Id.
Once complete, your organization will be generated and you can play around with your Dynamics 365 trial.

Sunday, October 13, 2019

Why Sitecore along with Dynamics 365 can deliver great benefits to the most aspiring and demanding Customers?

Why Sitecore with Dynamics 365?

Customers are becoming increasingly demanding now a days.To fulfill their aspirations you need data regarding every customer's purchase history, behavior, location and preferred method of interacting with you. You may already possess the data you need, but that does not necessarily mean that you can turn the data into actionable steps. However, combining the power of Dynamics 365 with the power of Sitecore can help you achieve your goals.

What is Strength of Dynamics 365 along with Sitecore?

Sitecore is a powerful CMS and supports for multichannel, contextual marketing, however Dynamics 365 offers true customer relationship management, allowing you to build direct relationships with your customers and boost sales and fulfill customers' expectations and needs.

What they offers together?

After having a little deeper look at both Sitecore and Dynamics 365 you can discover that the combination of Dynamics 365 and Sitecore can deliver some tangible benefits.

You can enhance your analytics as well as your reporting capabilities. The combination lets you combine web activity with customer profiles to give you a better picture of their intentions and behaviors. For example, an existing contact who visits your website's pricing page several times in a brief period may be receptive to a sales call.
You can improve email campaigns. Reports of the death of email marketing are premature; email is still an effective tool for engaging customers. Dynamics 365 and Sitecore both have email tools, but combining them can boost your success. Sitecore's email experience manager can help you create relevant, effective emails, while Dynamics allows you to target groups and relay the results to your contact profiles.
You can deliver personalized web content. Increasingly, visitors to your website expect personalized, relevant content. You can use the data gathered about each contact in your CRM to allow Sitecore to display content that has been tailored to each visitor's needs.
You can improve your customer service. Customer retention is a critical part of building or growing a business. Integrating Sitecore with Dynamics can make it easier to give your customers better service. For example, you could design a form for your website that allows customers to submit support tickets or build surveys to obtain information. The information entered can be transferred automatically to your CRM.

Conclusion

In short, Sitecore or Dynamics alone can offer many benefits for your sales team. Together, they can help you achieve greater success in personalizing your content, attracting new customers and enhancing your customer service. 

Wednesday, October 9, 2019

How to create Multiple web sites in Sitecore


Step 1: copy the following line from
C:\inetpub\wwwroot\(Websites Name)\App_Config\Sitecore.config


Step 2:  create the file in the given place
C:\inetpub\wwwroot\(Websites Name)\App_Config\Include\z\somename.config

Step 3: make appropriate change as per you choice and take the refrence from image
Note: hostName is case sensative therefore only N should be capital
<?xml version="1.0" encoding="utf-8" ?>
<configuration xmlns:patch="http://www.sitecore.net/xmlconfig/">
  <sitecore>
    <sites>
      <site name="americasite" patch:before="site[@name='website']"
           inherits="website"
            hostName="america.sitecore.com"
            rootPath="/sitecore/content/America"
            startItem="/home"
            database="master"
           />
    </sites>
  </sitecore>
</configuration>
Step 4: create the Binding  with the hostName


Step 5:  open Host config File and make appropriate change
C:\Windows\System32\drivers\etc\hosts.config
Find these files( Red coloured is the name of Sitecore instance name  which have been installed on the system and yellow coloured is the name of sites name)
127.0.0.1              solridentityserver.dev.local
127.0.0.1              solrxconnect.dev.local
127.0.0.1              solrsc.dev.local
127.0.0.1              america.sitecore.com
127.0.0.1              india.sitecore.com

Step 6: open the sites in new browser with
http:// america.sitecore.com /kejriwal
refrence following image

Friday, August 9, 2019

C# - Dynamic Type

C# 4.0 (.NET 4.5) introduced a new type that avoids compile time type checking,  it resolves type at run time.
dynamic myStr= "Ram";

myStr++;  // it wont give any error but when we run then it will through error.

Console.WriteLine(myStr.GetType().ToString());

A dynamic type changes its type at runtime based on the value of the expression to the right of the "=" operator.

dynamic myStr= 100; Console.WriteLine("Dynamic variable value: {0}, Type: {1}",myStr,
myStr.GetType().ToString()); 

compiler would not check for correct methods and properties name of a dynamic type therefore it will allow to write the method name which is actually not there in class. It will throw error at run time.

A method can have dynamic type parameters so that it can accept any type of parameter at run time. 
class Program { static void PrintValue(dynamic val) { Console.WriteLine(val); } static void Main(string[] args) { PrintValue("Hello World!!"); PrintValue(100); PrintValue(100.50); PrintValue(true); PrintValue(DateTime.Now); } }


Points to Remember :

  1. The dynamic types are resolved at runtime instead of compile time.
  2. The compiler skips the type checking for dynamic type. So it doesn't give any error about dynamic types at compile time.
  3. The dynamic types do not have intellisense support in visual studio.
  4. A method can have parameters of the dynamic type.
  5. An exception is thrown at runtime if a method or property is not compatible. 


C# indexers

C# indexers are usually known as smart arrays. A C# indexer is a class property that allows you to access a member variable of a class or struct using the features of an array. In C#, indexers are created using this keyword. Indexers in C# are applicable on both classes and structs. 
Instances of that class can be accessed using the [] array access operator.

Important points to remember on indexers: 

  • Indexers are always created with this keyword.
  • Parameterized property are called indexer.
  • Indexers are implemented through get and set accessors for the [ ] operator.
  • ref and out parameter modifiers are not permitted in indexer.
  • The formal parameter list of an indexer corresponds to that of a method and at least one parameter should be specified.
  • Indexer is an instance member so can't be static but property can be static.
  • Indexers are used on group of elements.
  • Indexer is identified by its signature where as a property is identified it's name.
  • Indexers are accessed using indexes where as properties are accessed by names.
  • Indexer can be overloaded.

Indexer are defined in pretty much same way as properties, with get and set functions. The main difference is that the name of the indexer is the keyword this.

Difference between Indexers and Properties

Indexers
Properties
Indexers are created with this keyword.
Properties don't require this keyword.
Indexers are identified by signature.
Properties are identified by their names.
Indexers are accessed using indexes.
Properties are accessed by their names.
Indexer are instance member, so can't be static.
Properties can be static as well as instance members.
A get accessor of an indexer has the same formal parameter list as the indexer.
A get accessor of a property has no parameters.
A set accessor of an indexer has the same formal parameter list as the indexer, in addition to the value parameter.
A set accessor of a property contains the implicit value parameter.


Indexers are commonly used for classes, which represents some data structure, an array, list, map and so on.

using System;
using System.Collections.Generic;
using System.Linq;
using System.Text;
using System.Threading.Tasks;
namespace ConsoleApp4
{
    public class Customer
    {
        private List<Address> Addresses = new List<Address>();
        public Customer()
        {
            Addresses.Add(new Address { Pincode = 110059, Mobile = "9999999999" });
            Addresses.Add(new Address{ Pincode = 110064, Mobile = "8888888888" });
        }
        public Address GetAddress(int Pincode)
        {
            foreach (var item in Addresses)
            {
                if (item.Pincode == Pincode) return item;
            }
            return null;
        }
        //Indexer property
        public Address this[int Pincode]
        {
            get
            {
                foreach (var item in Addresses)
                {
                    if (item.Pincode == Pincode) return item;
                }
                return null;
            }
        }
    }
    public class Address
    {
        public int Pincode { get; set; }
        public string Mobile { get; set; }
    }
    class Program
    {
        static void Main(string[] args)
        {
            Customer cust = new Customer();
            //Address addr= cust.GetAddress(110059);  //calling the method through class object
            Address addr = cust[110059];  // we have used indexer on class itself instead of calling the properties through class object
            Console.WriteLine(addr.Mobile);
            Console.ReadKey();

        }
    }
}